Understanding that Widget is an essential element in Magento 2 and helps the visitors view and surf your website with ease is important. This is why the Mageplaza team is going to address this topic today: How to Create a Widget in Magento 2.
First, we’ll have a general look at the tutorial. To make the instructions easy and understandable, let’s begin with a short explanation of what exactly is a Widget. If you already know what a Widget is and the functions it serves, you can skip the following heading and head straight to the next heading.
Let’s begin!
Widget and Its Function in Magento 2
According to WhatIs.com, a widget is an element of a graphical user interface (GUI) that displays information or provides a specific way for a user to interact with the operating system or an application. Similarly, Widgets in Magento 2 can be explained as small blocks which perform a definite function on your website.
There are many types of widget and Magento 2 supports the following types of widget by default: categories, tag cloud, navigation menu, calendar, search, and recent posts etc. Correspondingly, store admins can use the widget to improve the user-experience as well as the functionality of the store.
Here are some achievable implementations of Magento widgets:
- Dynamic product data,
- Dynamic recently-viewed-item lists,
- Promotional images placed on different Magento frontend locations,
- Interactive navigation elements and action blocks,
- Dynamic flash elements that can be easily configured and embedded in content pages,
- And so on.
In fact, the method to create a widget in Magento 2 is almost the as same as building an optimized front-end extension with a simple module. Hence, there is no complexity since customization for widgets is much simpler than the helloworld module.
Let’s get creating.
Creating a Magento 2 Widget
To create a Magento 2 widget, please follow the 4 steps below:
- Step 1: Initialize widget
- Step 2: Create a widget template file
- Step 3: Create a widget block class
- Step 4: Post widget
Step 1: Initialize Widget
Create a file etc/widget.xml with the following content:
<?xml version="1.0" ?>
<widgets xmlns:xsi="http://www.w3.org/2001/XMLSchema-instance" xsi:noNamespaceSchemaLocation="urn:magento:helloworld:Magento_Widget:etc/widget.xsd">
   <widget class="Mageplaza\HelloWorld\Block\Widget\Posts" id="mageplaza_helloworld_posts">
       <label>Blog Posts</label>
       <description>Posts</description>
       <parameters>
           <parameter name="posts" sort_order="10" visible="true" xsi:type="text">
               <label>Custom Posts Label</label>
           </parameter>
       </parameters>
   </widget>
</widgets>
Step 2: Create a Widget Template File
Create a file with the path view/frontend/templates/widget/posts.phtml, and add this code to it:
<?php if($block->getData('posts')): ?>
   <h2 class='posts'><?php echo $block->getData('posts'); ?></h2>
   <p>This is sample widget. Perform your code here.</p>
<?php endif; ?>
Step 3: Create a Widget Block Class
Create block file: Block/Widget/Posts.php
<?php
namespace Mageplaza\HelloWorld\Block\Widget;

use Magento\Framework\View\Element\Template;
use Magento\Widget\Block\BlockInterface;

class Posts extends Template implements BlockInterface
{
   protected $_template = "widget/posts.phtml";
}
Step 4: Post Widget
- Before posting the widget, you should flush cache by opening SSH terminal and run this command in the root directory of Magento 2:
php bin/magento cache:flush
- Then go to Admin panel > Content > Pages > Homepage > Edit
- In the Content tab, click on Insert Widget icon.
![]()
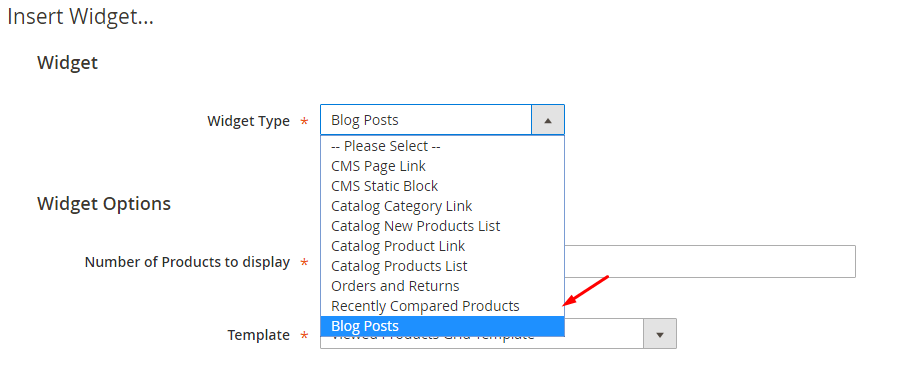
And here is the result, and you will see the Blog posts in the widget list.

And that’s about it. Now that you know how to create a widget in Magento 2, you can go and start empowering your website with added functionalities. If you have any questions, just use the comments section below and let’s get talking.
Author Bio:
Mageplaza is one of the top of Magento Extension Providers and custom development services. With over four years of comprehensive experience in Magento Module Development, we are committed to provide the highest quality extensions and services for our E-business customers.


